Quick and not so dirty tricksSite Survey and making a Path Profile
Selection of Equipment, antenna feeder etc Calculation for path loss Site Survey. Physical identification of the site(s) on GoogleMap is primary requirement. - Goto http://www.heywhatsthat.com/profiler.html and find your site locations. Mark both the points and view the path-profile. - Select frequency (2400MHz for 802.11b or g) - Cater of earth curvature - Confirm that you have clear line of sight, WiFi will not work if there is some intervening feature. - If not, find an alternate place. - Increase antenna height only if it is actually possible. |
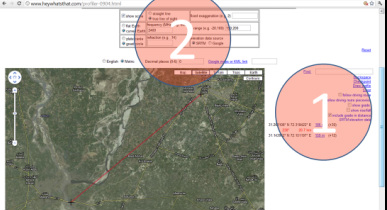 | A typical screenshot of profiler. I ll explain different steps required for basic understanding. For details please check the help available with the websitesite.
Choose two points (WiFi sites) on the map. (you must zoom-in and pin-point your location). Profile can be plotted between more than two sites as well |
1
In this area, you can see the lat-long of the points clicked on the map. To add antenna height, click on the height (on right of lat-long link) In the pop-up window put antenna height with '+' sign, Backspace will delete the last point, whereas clear will remove all points. Draw profile will make a path profile 2 Select 'true line of sight' and 'curved earth' Put the frequency to see the freznal zone clearance. | 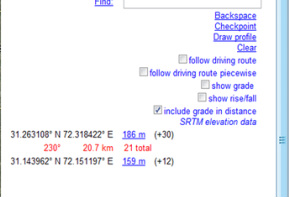 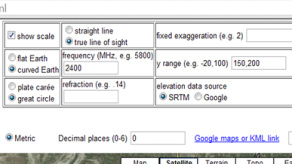 |
Path Profile

Path profile will appear on top of map. Since it is a flat area, so at 20 km you can spot the trouble of freznal zone. I actually increased the height on second site to 100 ft too, to have a reliable link.
Selection of equipment
Permissible power for WiFi, in most of the countries is 200mW. However 500mW and even 1W equipment is easily available.
WiFi access point TP-Link 5110 is the most inexpensive router with 500mW power. Though it is not designed to be used outdoors, but a little improvisation can do the trick to make it outdoor worthy system.
I have found outdoor ready 1W equipment named Bullet by UBNT, extremely stable and useful. It has an added advantage of N type antenna connector which plugs into most of the out-door WiFi antennas directly with out any feeder or connector loss.
Use of feeder for WiFi is a BIG NO NO. The equipment should be mounted with the antenna directly or at the best with a 'pigtail' adapter cable.
For distances 13 km or less TP-Link 5210, is outdoor ready with embedded antenna.
Calculation for path loss etc
Use calculators on my home page
Dont be optimistic, keep an hefty margin for weather and terrain conditions.
Dont be optimistic, keep an hefty margin for weather and terrain conditions.
